Saturday, December 15, 2012

Pinterest Fail: The Truth about Sharpie Mugs (UPDATED with some Sass)


UPDATE: To everyone trying to offer up tips using different types of materials: the point of this post was to debunk the fact that all the pins on pintereset said that you could do this with REGULAR PLAIN ORDINARY SHARPIES. That's the whole appeal of the project for people; that the supplies are things everyone has on hand. We set out to do this project in the first place because of how inexpensive it was. All the stuff you guys are suggesting costs more and would only be cost effective if you were planning on making a ton of them to sell. We were just trying to let people know that this isn't something that is durable as per the instructions and materials. Yes, parts of the sharpie did stay on, but really how long would that last if most of it came off after one wash. The simple fact of the matter is that the project is inherently flawed right from the beginning because the mugs have already been glazed. Sharpie ink is just not gonna penetrate the glaze no matter how long you bake it or how hard we wish on shooting stars. Sure it might endure a few washes, but in the long run it will come off. So we were just trying to stop people from wasting time making beautiful decorations just for it to come off in a month. Anyways, if you are really serious about decorating your own mugs then definitely check out some of the suggestions in the comments.

We're finally back after our month long hiatus! We've missed blogging and are finally getting back into the swing of things! 

We're going to kick things off by sharing a pinterest fail with you guys. We decided to hop on the bandwagon and give the famous Sharpie mugs a go because we thought they'd make excellent gifts. We were definitely skeptical going in because we knew the project was too easy to be true! But we went against our better judgment and each spent time decorating a lovely mug. 

Long story short, when we washed our mugs a lot of the ink came off. So we went on a quest to figure out if we had done something wrong. After our extensive research we've determined that this method of decorating mugs will never ever work. These mugs already have a glazed finish on them, which means that plain old sharpie ink will never stick on to them. So no matter how long you bake them, the ink will never penetrate the glaze. 

If you are really set on decorating your own mugs, we suggest looking into ceramic paints and pens. The pens are a bit pricey so you should only get them if you're really serious about this project. 

Now time to share the pics! 

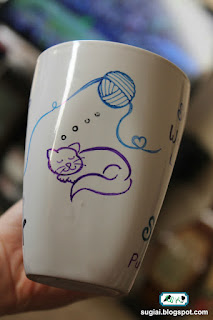
Ai's mug was so cute! We were definitely super sad about the outcome! 

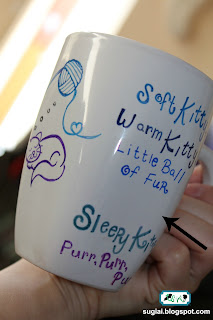
A whole section of text wiped off and the rest of it faded and smudged. 

The cat held up pretty well but probably would've been gone after a couple of washes.

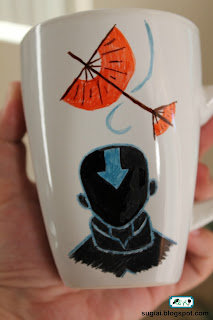
My mug before the wash.

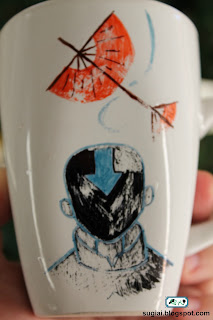
The mug after a gentle hand wash! 

That's all for this week folks! We hope this helps you all to avoid wasting time and money on this project! We have a bunch of amazing Christmas crafts with you in the coming weeks! Happy crafting and happy holidays! ♥  

Wednesday, October 31, 2012

Halloween Costumes 2013: Pokemon!


Happy Halloween! This year we decided to nerd out hard and do Pokemon! Ai and her boyfriend were the iconic Pikachu and Ash! I was Bulbasaur because he's a classic and I love his colors! The costumes were so much fun to make and wear. We showed them off over the weekend and were so thrilled by how excited everyone was over them! We did the big Halloween bar crawl thing that our city does every year and heard screams of PIKACHUUUUUUU and POKEMONNNNN (and SQUIRTLEEE because some people thought I was him! >_<) everywhere! 

Like always we tried to make the costumes different from everyone else's. Ai I had the brilliant idea for me to make animal hoods! I used this pattern but I blew it up to make the hoods extra big. If you do use that pattern and tutorial be forewarned that the hood does come out about the size of just your head. I had to buy more fabric because I wasted some making the hood as it was. Anyway, I made mine and Ai's whole outfit, except for the leg furries and my shirt. Ai did Ash's hat and I made the shirt. I forgot to make Ash's gloves, but if we do end up wearing these to our local Comic Con in the spring I'll make sure to make some. 

Alright enough of my rambling, it's time for the costumes! 


Pikachu and Bulbasur!!! I love how the costumes turned out! 

I love this pic! They make the cutest Ash and Pikachu couple ever!!! 

Hahahaha we had fun playing around! "Pikachu sucker punch Bulbasuar!!!!!"

Ai is hands down the cutest Pikachu out there!!!

I'm Bulbasaur not Squirtle!!! >_< hahahaa I'm just glad no one thought I was a dinosaur!

Ash chooses you!!!! 


A wild Pikachu appears! 

hahaha we look a little creepy here! I think we were preparing for battle or something! We're obviously not good at modeling! 

Bulbasuar!!!!

Pikachu!!!

That's all for this week folks! I hope everyone has a fun and safe Halloween tonight!!! Now it's time to start on our Christmas crafts! Happy crafting!!!  ♥  

Thursday, October 25, 2012

Wedding Cake and Poker Chip Cookies


Ai and I have been busy bees this month! Ai's co-worker had a vegas themed wedding recently and Ai wanted to give her a cake as a gift. We were told to do whatever we want and Ai came up with a really beautiful design! We kept it simple by having the cake toppers be a bride and groom cookie and adding a few sugar butterflies and fondant flowers. 


The bride cookie was decorated with royal icing and sugar pearls.

The groom cookies

We made poker chip cookies! 


We had a few hiccups along the way, but the cake ended up really lovely.

I love the bride and groom cookies. Ai got the idea from Pinterest! 

Ai came up with the clever idea to put a small tiered cake to prop up the cookies.

We really fell in love with these sugar butterflies, so expect to see them everywhere! 


We had a lot of fun making this cake and it's amazing to see how far we've progressed! That's all for this week folks! Halloween is coming up and we're super excited to reveal this year's costumes and can't wait to see yours! ♥  

Thursday, October 18, 2012

Adventure Time Costume Re-do


This week's post is another costume re-do. I finally took better pictures of the Jake costume. Unfortunately I haven't gotten around to fixing the Finn costume. When I do, I'll be sure to post yet another update on them. We might even do a whole Adventure Time group! 


Jake posing with Finn's sword

I've been obsessed with doing action shots! 

Jake ready to set off on an adventure

I made the hands like this so she could have free use of her hand.

That's all for this week! Halloween is getting closer and I'm almost finished with all of this year's costumes. Happy crafting! ♥  

Thursday, October 11, 2012

Ninja Halloween Costume Re-do


I'm so excited it's finally October because it means it's the start of the holiday season! To countdown to this year's Halloween costumes, I'm re-blogging the past costumes. But this time around we finally did proper photo shoots for all of them! 

We're kicking things off with the ninja costume! 


The ninja is all geared up and ready for her mission! 

The weapons were all made out of cardboard, electrical tape, lots of hot glue, and acrylic paint.

A kama

Shuriken and kunai

Lady ninja getting ready to throw her shuriken! 

Just hanging out in a tree, waiting to strike! 

Took some action shots and they came out pretty good! 

My sister really is a ninja! 

That's all for this week folks! Can't wait to reveal this year's costumes! Hope you all are working hard on making some fantastic costumes! Happy crafting! ♥  

Friday, September 28, 2012

Rainbow Butterfly Cake


Today's post is one we had a lot of fun doing! A really great friend ours is celebrating her birthday today, so we decided it was about time we made her a cake! She wanted white cake, which I thought would be the perfect time to finally try out the rainbow cakes I've seen floating around the internet! I've also been obsessing over these sugar butterflies, so we decided to kill two birds with one stone. 

I won't go into too many details about how we made the cake because it was pretty straight forward. The cake was white cake tinted with food coloring until it was the shade we wanted. The frosting was cream cheese frosting, which you can find the recipe for here. As for the butterflies, I think we'll make a tutorial sometime in the future. Now on to the cake because we're just so excited with how it turned out! 


The cakes cooling off. I thought they looked like play dough.

The uncovered cakes while I was stacking and trimming them.

We tried to go with a tree bark sort of texture. 

Ai was making the butterflies while I was baking! This is usually how we work, I'm the baker and she's awesome at decorating! 

The butterflies while they were drying. 

More butterflies!

Ai's piping skills are phenomenal! 

We arranged the butterflies so that they spiraled upward in the order of the rainbow. 

Since the cake was round, it was utterly impossible to get all the butterflies in the picture! >_<

Beautiful blue butterflies! 

Transporting the cake was difficult! The poor butterfly on top decided to lay down! lol It was our fault for not giving the butterflies enough time to dry. 

The inside of the cake! 

We were so happy that the cake cut beautifully! 

That's all for this week folks! October is coming, which means we'll be working on Halloween costumes!!!! Happy baking and crafting! ♥